Showing posts with label Japanese. Show all posts

Wednesday, 11 March 2015

Hina-Matsuri Birthday Party: Persian-Japanese popcorn

Savoury and sweet Persian-Japanese popcorn

Wow! Has it really been TWO years since I updated this blog?! Pretty slack, I know, but in my defence, the charger for my digital camera was AWOL in Australia for a year. Oh, and there was the little matter of keeping the books for an international translation conference that ended up being a 600-plus attendee sellout...

Anyway, it is well and truly time dip my toe back into the blogging waters again, and there's nothing like a birthday bash to get the blogging juices flowing...

I threw a Hina-Matsuri themed bd party this year, to coincide with the March 3 Japanese festival that celebrates little girls (and bigger ones now, too).
Hina dolls displayed in a shopping mall

In the lead up to the festival, which is also known as Girls' Day and the Doll Festival, families with daughters arrange exquisite sets of dolls dressed in Heian imperial court finery and miniature accoutrements of court life on a multi-tiered platform, with the imperial couple taking pride of place on the top tier. 

Peach and rape blossoms, the floral harbingers of spring, often adorn the displays, while brightly coloured chirashi-zushi ("scattered sushi") and diamond-shaped pink, white and green sweets grace the festive table. It is a lovely way to give thanks for the blessings a daughter brings and to pray for her good fortune in life and in finding a husband.

I had my 17th birthday as an exchange student in Japan just a month after arriving, and Hina-Matsuri was one of the first traditional celebrations I came in contact with. I remember helping set up the hina display, carefully unwrapping the dozens of delicate items that made up the set that had been cared for by my host family for generations, and placing each in its designated spot on the display platform. How different it was from setting up a Christmas tree, the only similar activity I had to compare the job to! 

Another Hina-Matsuri tradition is sweet rice crackers in shades of pink and green, and these hina-arare were the inspiration for my Persian-Japanese popcorn. I knew I wanted my popcorn to be pink and green, and Persian and Japanese, and savoury and sweet. With that laundry list of requirements, I set out to find ideas on how to do it.

Obviously matcha, or powdered green tea, had to represent Japan, but what could stand up for Iran? How about sumac, that lip-smacking pinky-purpley tart powder? Consulting St. Google, I came across just the thing on the lovely Azita's blog Fig and Quince


Diamond-shaped chirashi-zushi "cake"
with green white and pink layers
I was now on my way but, as it turns out, tracking down recipes was the easy bit. I needed to run all over town the night before the party hunting for corn kernels! Who knew they would be so hard to come by. (Hint: Seijo Ishii stocks them : ))

So how did it go down? A real treat at the party, and the bag I squirrelled away for my colleagues to try was the talk of the office for days. One girl said it was better than Disneyland popcorn--a good thing, I understand ; )

I include directions for popping the corn, as there might be others, like me, who've never done it before!

Persian popcorn

1 tbsp vegetable oil
3 tbsp popping corn
30 g  butter
1/4 tsp bicarb soda (baking soda)
pinch of saffron threads ground together with a pinch of salt
1 tbsp boiling water
coarse sea salt, to taste
sumac powder, to taste

1 Place the oil and corn kernels in a large pot on a medium flame. Cover with a lid and shake frequently until the popping starts, and constantly after, until it stops. Remove from the heat straight away to prevent burning.

2 Dissolve the ground saffron and salt in the boiling water. Melt the butter in a wok or large frying pan and add the saffron liquid and bicarb soda. It should bubble up nicely. 

3 Toss the popcorn in the saffron butter until coated evenly. Dust with salt and sumac to taste. 

Recipe source: Adapted from the Persianized popcorn recipe at Fig and Quince 

Matcha caramel popcorn


1 tbsp vegetable oil
3 tbsp popping corn
1/2 tbsp matcha (green tea) powder
1 tbsp boiling water
30 g  butter
40 g marshmallows

1 Place the oil and corn kernels in a large pot on a medium flame. Cover with a lid and shake frequently until the popping starts, and constantly after, until it stops. Remove from the heat straight away to prevent burning.

2 Dissolve the matcha powder in the boiling water. Melt the butter and marshmallows in a wok or large frying pan and add the matcha liquid.

3 Toss the popcorn in the matcha butter until coated evenly. 

Recipe source: Adapted from the 3-colour caramel popcorn recipe at Rakuten (in Japanese)

Friday, 9 July 2010

Shiomomi nasu: Salt-massaged eggplants with Japanese aromotics


I have been addicted to nasu (Japanese eggplants) this last while. They are everywhere at the moment, and the cooking magazines (which I really have to stop tempting myself by looking at) have 101 different ways to use them. The "Mighty Nasu" indeed (to paraphrase one of my foodie heroes Ottolenghi).

Yes, the eggplant/aubergine/patlican/baademjaan/badinjaan/baingan/ brinjal is beloved to many cuisines, but have you ever had it raw?? Most of the world makes a fuss about removing the bitterness from eggplants before cooking them, but here in Japan, it couldn't be easier: Just squish around in a bag with salt! The dark, bitter juices come right out, and you don't even need to cook them. How good is that?

This quick side dish recipe is from the June 17, 2010 edition of the Japanese food fortnightly Orange Page (don't ask; I'm as mystified by the name as anyone...). I thought it not bad, for my first attempt at salt-massaged eggplants, but with the Japanese big three aromatics shiso (perilla leaves), myoga (myoga ginger) and raw fresh ginger, it may be a bit "medicinal" for some tastes.

The trick to this dish is to make sure that all the eggplant slices get massaged well, and to slice the aromatics very finely.

I haven't tried this with the larger eggplants that you tend to find outside Japan, which are called bei-nasu (American eggplant) in Japan. For now, I suggest you seek out small, round Japanese nasu, which weigh about 80-100 g each.

Salt-massaged eggplants with Japanese aromatics

Serves 4 as a small side dish with other Japanese dishes

2 nasu Japanese eggplants (about 160 g total), sliced into 2 mm thick rounds
2/3 tsp salt
3 shiso (perilla) leaves, rolled and sliced very thinly
1 myoga (myoga ginger) bud, halved lengthwise and sliced thinly
1 thumb-sized piece of fresh ginger, peeled and chopped into thin shreds
splash of Japanese soy sauce (to taste)

1 Place the eggplant slices in a small polythene bag and add the salt. Press out all the air and hold the opening of the bag tightly closed with a thumb. With both hands, gently squeeze the eggplant slices until they loose their juices, most of their bulk and become pliant. Make sure not to miss any of the slices. Tip into a colander and rinse with water. With your hands, squeeze out as much of the water as possible.

2 In a small bowl, toss the shiso leaves and myoga. Add the salt-massaged eggplant, sliced ginger and a splash of Japanese soy sauce. Toss again and serve in tiny bowls as an accompaniment to other Japanese dishes.

Enjoy!

Thursday, 8 July 2010

Harumi's summer: Rice bowl with stir-fried veggies & teriyaki chicken

I must not buy cookbooks and foodie magazines, I must not buy cookbooks and foodie magazines, I must not buy...

And the reason I must not buy them is that I have been asked by the landlady to move out of my rented apartment after 15 years, as she wants to move in! I really don't know who she thinks she is! It is a terrible imposition, this not being able to buy cookbooks and--- (you get the picture).

I know it in my mind that I need to be shedding rather than adding to my foodie hoard, but heart wants what it wants. All of which is to say, I couldn't resist the latest edition of Haru-mi magazine, Harumi Kurihara's eponymous quarterly featuring, this time, izakaya-style recipes for summer.

Surprisingly, summer cooking in Japan does not necessarily mean light food. The humidity and high temperatures here can really zap the energy, and quite often people want a hearty meal to get them through the dog days of summer. Grilled eel is a case in point: Some enterprising eel purveyor back in the 1800s hit upon the idea of flogging his oil-rich catch as just the thing for boosting flagging energy levels during the summer. And just like that, a connection was made between eel eating and Doyo no ushi no hi (the hottest day of summer by the traditional Japanese calender; July 26 this year).

But I digress.

As I was saying, Japanese people often seek out substantial, well-seasoned food when the temperatures soar, so it is no surprise that quite a few of the dishes in the summer edition of Haru-mi are fairly hearty. This rice bowl being a case in point.

With a soy-and-sugar seasoned mince topping AND slices of teriyaki chicken, you might expect this to be stodgy, but the herbs and lemon keep this meal-in-a-bowl on the right side of the line.

The recipe does require some Japanese groceries, so do read it through first.

-- Mirin is a sweet sake used extensively in Japanese cooking. If you can't get it, you could try this substitute, just a plain sugar syrup or a dash of sugar at a pinch (but I wouldn't recommend this in this recipe).
--Katakuriko (dogtooth violet or more commonly potato starch) is used for thickening sauces and, as in this recipe, to give a distinctive mouthfeel.

On the other hand, you won't need store-bought teriyaki sauce for this recipe. Yay!

Rice bowl with stir-fried veggies & teriyaki chicken

For the ground meat topping

200g beef or pork mince
2 tbsp Japanese soy sauce
2 tbsp mirin
1 tbsp sugar

For the stir-fried veggies
100 g bean shoots, roots removed
1/2 small zucchini, cut into 4 cm long batons
1 small red (bell) pepper, halved and cut into thin slices
1 tbsp vegetable oil
1/4 tsp powdered chicken stock
salt & pepper

For the teriyaki chicken
4 chicken fillets
salt & pepper
Katakuriko or cornflour (cornstarch), for dusting
2 tbsp Japanese soy sauce
2 tbsp mirin
2 tsp sugar

steamed rice
lemon halves
coriander leaves, mint leaves and toasted sesame seeds (optional) to garnish

1 Make the ground meat topping. Heat Japanese soy sauce, mirin and sugar in a small pot, add the mince and stir, breaking up with bamboo cooking chopsticks, until most of the liquid has evaporated. Remove from the heat and allow the meat to absorb the remaining liquid.

2 Prepare the bean shoots, zucchini and red pepper.

3 Make the teriyaki chicken. Remove any fibrous parts from the meat, place between layers of cling film and flatten with a rolling pin [Saffron: lazy folk, like me, can just flatten the fillets right on the chopping board with the heel of their hand (I won't tell, if you don't)]. Cut each slice in three width wise. Sprinkle with salt and pepper, and dust each piece with katakuriko or cornflour. Heat oil in a frying pan and fry chicken on both sides. Remove from the pan.

4 Wipe out the frying pan and bring the Japanese soy sauce, mirin and sugar to a boil. When it becomes glossy, add the cooked chicken and toss well to coat. Remove from the pan.

5 Heat a little more oil in the pan and toss the zucchini and red peppers until slightly softened. Add the bean shoots and toss until heated through. Add powdered chicken stock and salt and pepper to taste.

6 Place a single serving of rice in each of 4 domburi or pasta bowls. Top each bowl with a layer of vegetables and a layer of the ground meat topping, sprinkle with coriander and mint leaves, and place the chicken slices on top, sprinkling over any teriyaki sauce that remains. Squeeze lemon over and garnish with sesame seeds, if desired.

Enjoy!

Wednesday, 12 May 2010

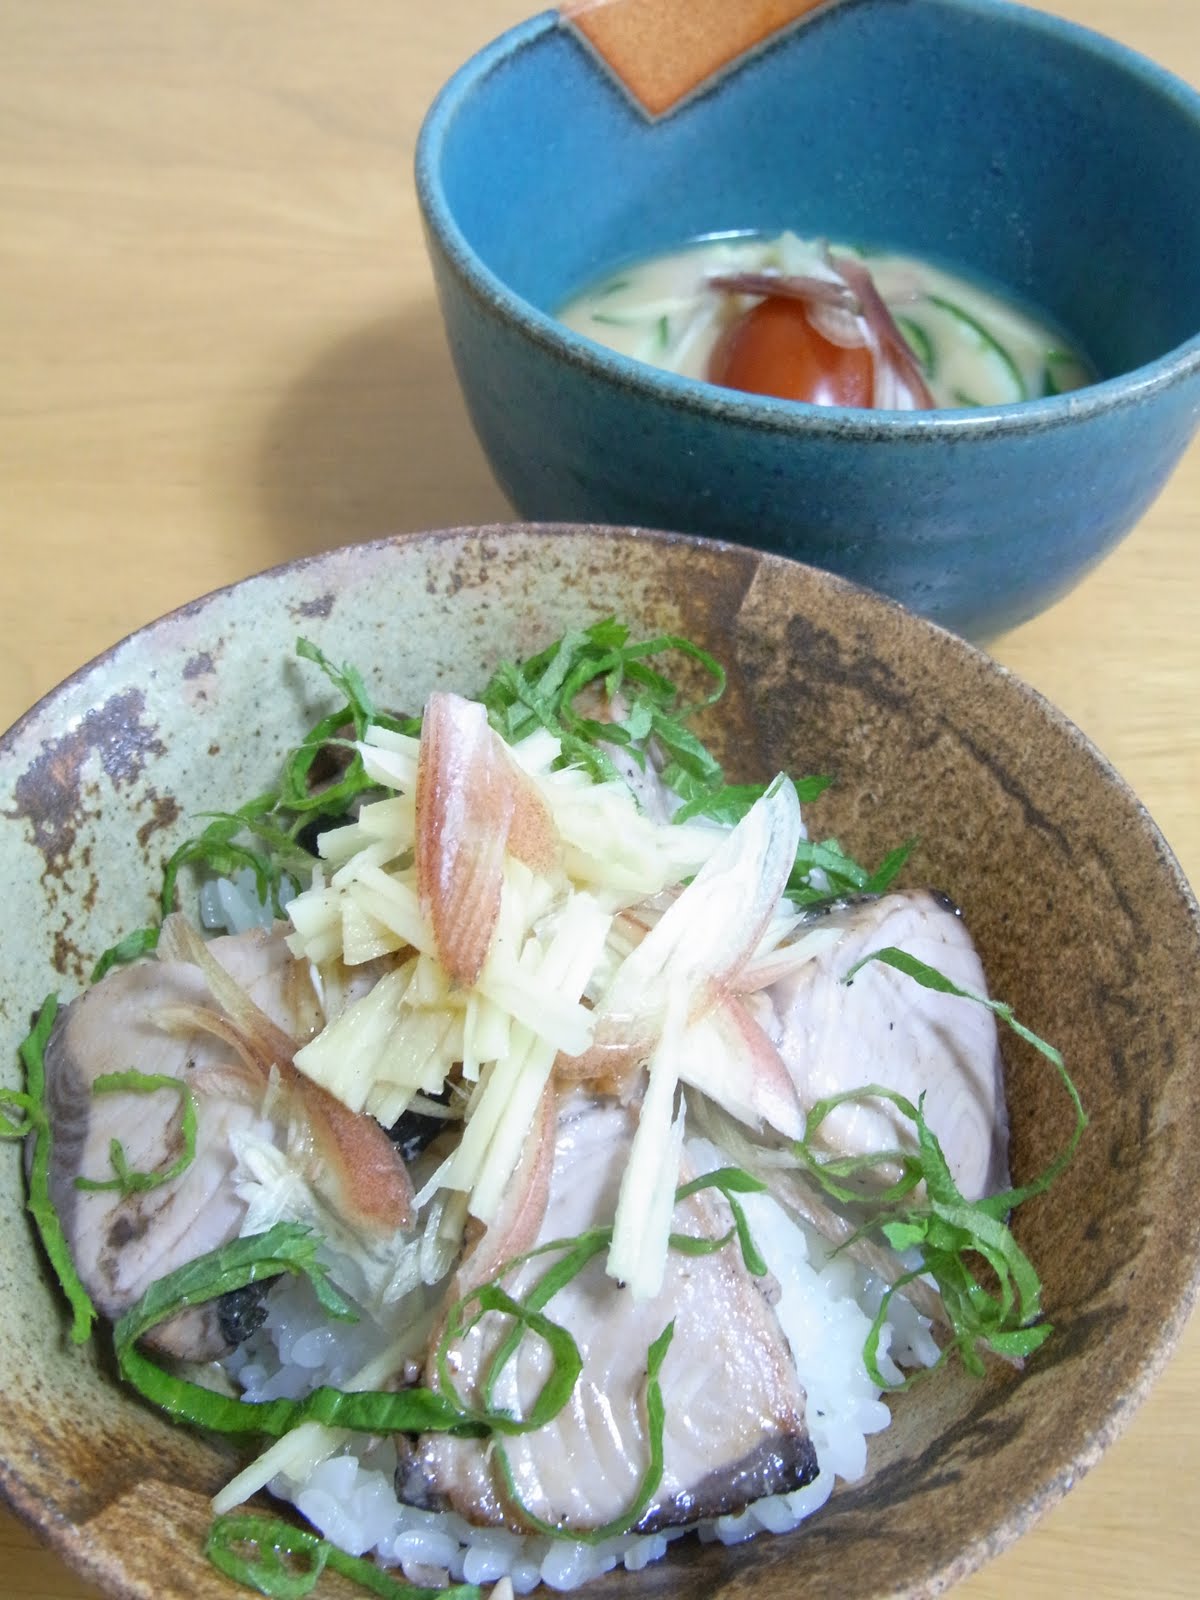
Bonito bowl with Japanese aromatics and chilled miso soup with summer vegetables


This is a recipe I learned around this time last year at the Japanese cooking classes I was taking at ABC Cooking Studio. It's a blow-you-away explosion of flavour that really wakes the tastebuds up!

Unfortunately, it contains some traditional Japanese aromatics that might be difficult to find outside the country. For green perilla (shiso), you could try substituting basil or even Thai basil, but there's not really any substitute for myoga (the bud of a ginger plant) that I know of. I've seen celery suggested, but other than a little crunch, I don't see any commonalities with myoga. Certainly, I wouldn't want celery with this dish, but to each their own. You'll also want to seek out ponzu or make your own instant ponzu by combining citrus juice (citron juice, for preference), soy sauce and unsalted dashi stock in a ratio of 1:1:1. (Or you could go the whole hog and make bottleable ponzu using this recipe, but that might be one to save until autumn, when citron is in season (g)) .

Katsuo no tataki, or bonito that has been seared on the outside and dunked in an ice bath to ensure that it is still raw inside, is sold in triangular ready-to-use blocks at Japanese supermarkets. You could try tuna or horse mackerel if bonito is not available, but there's no need to do the searing and ice bathing routine for this recipe, as the fish will be lightly fried in any case.

This went very nicely with chilled miso soup with summer vegetables, another ABC recipe. Chilled miso is a specialty of Miyazaki Prefecture, although this recipe seems to be a pared back version. There's no cooking involved in this, so it's perfect for a muggy Japanese summer's evening. I say the recipe is for 3-4. ABC recipes are often so calibrated that the portions of each dish can be rather small. The original recipe is for 4, but the Young Man and I pretty much polished this off between us in one sitting. Greedy guts that we are (g).

Just a quick note about surigoma or ground sesame seeds. You can buy ready-ground sesame seeds in Japanese supermarkets, but the flavour is better if you toast and grind them to a fine powder yourself.

Bonito bowl with Japanese aromatics

Serves 3-4

200 g katsuo tataki or tuna or horse mackerel
1 tsp vegetable oil
2 tbsp ponzu

200 ml short-grain rice
200 ml water

For the aromatics
4 green perilla leaves (ao-jiso)
12 g fresh ginger
1 myoga (aka myoga ginger)

1 g shredded nori (optional)
12 g garlic, sliced and deep fried (optional)

4 tsp ponzu

1 Wash rice 4-5 times until the water runs clear. Cover with water and leave to soak for around 30 minutes, drain, then cook in a rice cooker with the measured water.

2 Prepare the aromatics. Cut the stalk out of the perilla leaves, stack one on top of the other and roll together to form a "cigar". Slice finely into shreds. Peel the ginger and finely julienne. Soak briefly in water, then drain. Cut the stalk off the myoga, halve lengthwise and slice finely on the diagonal. If using garlic chips, peel each clove and slice into rounds. Punch out any green part with a chopstick. Deep fry until golden brown at 160 degrees C, then drain on kitchen paper.

3 Cut slices from the bonito block about 7 mm thick. Heat vegetable oil in a large frying pan and cook bonito slices briefly, turn and cook the other side (about 2 min total). Remove to a bowl and pour over 2 tbsp ponzu.

4 To assemble, divide rice between bowls, top with bonito slices, shiso, ginger and myoga. Garnish with shredded nori and garlic chips, if using, and sprinkle 1 tsp of ponzu over each bowl.

Chilled miso soup with summer vegetables

For the soup
2 g dashi konbu (dried kelp for stock)
220 ml water
24 g miso paste (mixed miso, for preference)
2 tbsp white surigoma (roasted sesame seeds ground to a course powder)
1/2 tsp raw sugar

2 ripe fruit tomatoes or other mid-sized tomatoes, peeled
1/2 Japanese cucumber (around 50 g)
1 myoga bud

1 Make the dashi. Wipe the kombu with a damp cloth and make cuts in 2-3 places to help the flavour come out. Place in the water and leave for at least 30 min.

2 Prepare the vegetables. With a sharp knife, cut the tomatoes in half through the stalk end, then cut shallow crosses in the rounded side of each tomato half. Slice the cucumber thinly on the diagonal, then cut the slices lengthwise into shreds. Cut the stalk off the myoga and halve lengthwise. Cut each half into thin slices on the diagonal.

3 Make the soup. With a whisk, blend the miso, sesame paste or tahini and raw sugar until smooth. Gradually stir in the kombu dashi. Chill until ready to serve.

4 To serve, place tomato halves in four bowls with the rounded side upwards. Divide the soup between the bowls and top each tomato half with the cucumber and myoga.

Enjoy!

Monday, 4 January 2010

Osechi tier 2


(1) Date-maki (sweet rolled omlette with fish paste)

Symbolizes fashion sense
Time/Effort: * Cost: * Flavour: ***

This is super easy, delicious and quite dramatic in the jubako. Unlike regular sweet rolled omlettes, this one contains the fluffy, white fish cake hanpen. This makes for a lusciously spongy omlette. Date-maki mats are not readily available, even in Japanese department stores. I managed to acquire one at the Kappa-bashi cooking supplies town in Tokyo, but only after the fact. A regular sushi rolling mat will do fine, even if it does not produce the customary zig-zag pattern.


4 eggs
1 hanpen (a cake of pounded white-fleshed fish) (approx. 110 g)

32 g cane sugar or other brown sugar [Saffron: I used tensaito (beet sugar)]
1 tbsp mirin
1/4 tsp Japanese soy sauce [S: Do not substitute Chinese soy; it is much saltier]

1/2 tsp vegetable oil

Equipment:
Date-maki mat or sushi rolling mat
2 elastic bands

1 Break hanpen up and place in the bowl of a food processor or blender. Add eggs, cane sugar, mirin and Japanese soy sauce and process or blend for 30 sec.

2 Heat oil in a medium frying pan. Pour in the hanpen-egg mixture and cover with a lid. Cook on a medium flame for 1 min, then reduce the heat to low and cook a further 15-20 min, or until the omlette is cooked through when pierced with a skewer and the top is dry. Turn off the heat, cover and leave to steam for a further 3 min.

3 Remove omlette from the pan onto a chopping board. Form into a "rectangle" by cutting off a 1.5 cm strip of omlette from the left and right sides and the edge furthest from you. Keep the uncut side closest to you. You will now have three long semi-ovals of cutout omlette. Cut the left and right semi-ovals in half across the middle.

4 Place the date-maki or sushi rolling mat on your work surface with the narrow side closest to you. Cover with cling film. Now place your omlette on top, with the uncut side closest to you. Keeping close to this edge, place the omlette cutouts on top of the omlette "rectangle" so that they form a neat rectangle at the "bottom" of your roll.

5 Firmly roll the omlette from bottom to top, keeping the wrap out of the way as you go. You should end up with a tight egg roll. Fold the ends of the wrap in at the sides. Secure the egg in the mat with a rubber band at each end, and leave to cool. If making ahead, refrigerate until ready to serve. To serve, remove rubber bands, mat and wrap, and slice omlette roll into eighths.


(2) Chicken matsukaze-yaki (Wind-in-the-Pines chicken loaf)

Time/Effort: * Cost: * Flavour: ***

This is another relatively easy Osechi fix. I upped the ginger a little from the original recipe. It is subtle, but certainly there. Use as little as 1/2 tsp, to suit your taste. You will need either a nagashi-bako, a two-part tin used in Japanese sweet-making, or a 15 cm x 15 cm square cake tin. I priced the correct-sized nagashi-bako at a local department store at 3,400 yen, and decided that was too much for something that will only get used once in two years. Kappa-bashi had the same item for under 2,000. I used the cake tin instead. I think I will scale the recipe up by 10% next time, to get thicker shapes at the end. If white poppy seeds and nori flakes are hard to come by, regular and black sesame seeds can be substituted. Sprinkle prior to baking. Matsuba-gushi (seen in the photos here) are used on happy occasions, such as weddings, as they symbolize two as an inseparable one. Unfortunately, they are a little hard to come by. I used regular dango skewers instead.

200 g chicken mince

4 tsp sugar (= 1 tbsp + 1 tsp or 1 Australian tbsp)
16 g white miso paste
2 tsp cooking sake
1 tsp Japanese soy sauce
1.5 tsp ginger juice squeezed from grated fresh ginger

40 g beaten egg (slightly less than 1 egg)
8 tsp panko breadcrumbs (= 2 tbsp + 2 tsp or 2 Australian tbsp)

1 tsp white poppy seeds
1 tsp nori flakes

Equipment:
15 cm x 12 cm nagashi-bako or similar sized square cake tin, with or without removable bottom
30 cm x 30 cm square of baking paper
8 matsuba-gushi bamboo skewers or other small skewers, about 5 cm in length

1 Create a liner for the nagashi-bako or cake tin by placing it at the center of the baking paper. Make 4 cuts in the paper from the edge of the baking paper to the left hand corner of each side of the tin. Make folds along the base line, line the tin neatly and set aside.

2 Preheat oven to 220 degrees C if using gas, 230 degrees C if using electric. Meanwhile, thoroughly mix the chicken mince, sugar, miso paste, sake, Japanese soy sauce and ginger juice in a bowl, using your hand like a whisk. Add the weighed egg and panko breadcrumbs and briefly mix again. Pour into the prepared nagashi-bako or cake tin and flatten the surface. Remove the air by gently tapping the nagashi-bako or cake tin against a flat surface a few times. Sprinkle one half of the chicken mixture all over with the poppy seeds.

3 Bake for 15 min, or until a skewer comes out clean. Cover with aluminium foil and return to the oven with the heat off to steam for a further 5 min. Remove the chicken loaf from the tin and cut in half along the poppy seed line. Sprinkle the plain half all over with the nori flakes. Cut each half into 4 long "fan" shapes by cutting across the width of the halves on the diagonal. Push a matsuba-gushi or other small skewer into the short side of each triangle to make fans. This is the shape of a hagoita, or battledore, used in Japanese New Year "badminton".


(3) Kikka kabu (chrysanthemum flower-shaped pickled turnips)

The chrysanthemum is the symbol of Japan's Imperial Family
Time/Effort: *** Cost: * Flavour: *

You really do want something crisp and tangy to go with all the soft and sweet in the Osechi lineup. These white turnips fit the bill nicely, but are a bit too fiddly for my liking. It took me over 20 min to slice just four of these! And then I went and forgot to soak them in the brine that would soften them up so the "petals" could be opened! I think I'll go for something more colourful and less breakdown-inducing next time. Something like this, maybe...

4 small kabu (white turnips)

500 ml water
1 tbsp salt

For the sweet vinegar:
1-2 tbsp yuzu (citron) juice

1 tsp rice vinegar
2 tsp sugar
1/8 tsp salt
1 tsp dashi stock
8 dried red pepper rings

1 Cut roots and tops off kabu and peel. Place kabu on work top with the top side up. Cut horizontal and vertical lines 1-2 mm apart into each kabu to a depth of about 2/3 the height of the kabu. Take care not to cut all the way through. A disposable chopstick placed on either side of the kabu will help prevent your knife from going too far. Repeat with other 3 kabu. Cut an x into the bottom of each kabu, taking care not to cut into the cuts on the top side.

2 Mix the salt into the water and soak kabu, cut side down, in this solution for about 30 min. Remove kabu from salt-water bath and pat dry.

3 Mix yuzu (citron) juice, sugar, dashi stock, vinegar, salt and red pepper rings in a zip-topped plastic bag. Add kabu, kneed lightly and leave to pickle for at least 2 hours, turning from time to time.

4 To serve, gently squeeze pickling juice from kabu. Open up the chrysanthemum "petals" and top with 2 red pepper rings.

These three recipes are adapted from those I learned at ABC Cooking Studio last December.

Osechi tier 1


I tried various recipes this year, only some of which I think I will repeat in New Years to come. I'm going to use a 3-star scale to remind me next time. The cost scale, naturally, reflects the cost of procuring ingredients/equipment in Japan.

(1) Kuromame (sweet black beans)

Symbolizes diligence (mame in Japanese)
Time/Effort: ** Cost: ** Flavour: ***

This is the same recipe as I used two years back (when last in Japan for New Year). I think I can improve it by using the pressure cooker to bring the beans to the soft point, so am making a note to myself now to that affect. I've still not managed to get any rusty nails, but all the Osechi cookbooks call for them, so they must have some affect. You could cook the beans in a cast iron pot, but I'm here to tell you that your beans will be lovely even if you don't.


(2) Tazukuri with pine nuts and cashews (Dried young anchovies with nuts in caramelized soy sauce)

Symbolizes an abundant harvest
Time/Effort: * Cost: *** Flavour: *

I was a little disappointed with this. The soy caramel totally overpowered the delicate flavour of the nuts. Given the cost of the nuts, I don't think I will repeat this one. Cheap sesame seeds are definitely the way to go. I think I may also not have let the caramel reduce enough; it was quite sticky. I'll keep looking for a tazukuri recipe, though. It's one of the easier Osechi dishes to make.

30 g gomame (dried young anchovies)
30 g pine nuts
40 g cashew nuts

2 1/3 tbsp soy sauce [Saffron: I would reduce this to 1-1 1/2 tbsp; it is very salty, otherwise]
2 tbsp sugar
2 tbsp cooking sake
2 tbsp mirin
2 tbsp oil

1 Spread the gomame on a heatproof dish and heat in the microwave until crisp, about 1-2 min. Remove any powder or debris. Toast the pine nuts and cashews separately in a dry frying pan, swirling constantly to ensure they do not burn.

2 Add the soy sauce, sugar, cooking sake, mirin and oil to a frying pan and heat over a medium-strong flame. When the liquid starts to bubble turn the heat down to low and reduce to a thick caramel.

3 Add the toasted nuts and mix thoroughly.

4 Remove to a wide plate, separating any clumps as you go. Allow to cool.


(3) Matcha-iri kurikinton (Sweet potato with chestnuts and matcha green tea)

Symbolizes wealth
Time/Effort: *** Cost: *** Flavour: ***

The Young Man and I were very happy with the kurikinton we had 2 years ago. But I thought this recipe might better it yet. And it did. This is definitely my new go-to kurikinton (or kuriClinton, as the YM calls it, referring to Mrs and not Mr C; he's too young to know the latter!). The only catch is that matcha and jarred chestnuts are expensive, even in Japan. I reckon the ingredient cost of this one dish was about 1,600 yen (around US$16). There were no kuchinashi (gardenia pods, Japan's saffron!) in this recipe, but I think I will cook the sweet potatoes with a pod or two next time. The jarred chestnuts used in this recipe are skinned and coloured yellow with gardenia, also; little gold nuggets! To cut down on the sweetness, I used less sugar and didn't add the glucose syrup. I've given the original recipe below.

500 g sweet potato (peeled weight)
1/2 tsp yaki-myoban (burnt alum) or 1 tsp baking powder
100 g sugar

150 g sugar
pinch salt
1/2 cup syrup reserved from jar of sweetened chestnuts

2 tbsp mizuame (glucose syrup)
15-20 sweetened chestnuts from a jar, halved or quartered

1 tbsp matcha green tea powder
1 tsp sugar
1 tbsp boiling water

1 Peel and cut sweet potatoes into 2 cm-thick rounds. Soak in water for around 10 min. Change water and mix in yaki-myoban or baking powder. Leave to soak overnight to remove tackiness. Drain, rinse and place in a large pot. Pour in the sugar and just enough water to cover. Bring to the boil on a medium flame.

2 Boil until soft, about 12-15 min, then drain. Mash and allow to cool. Use a wooden spoon to push sweet potatoes through a sieve.

3 Return sweet potatoes to the pot and add the sugar, salt and chestnut syrup. Heat over a medium flame, stirring with a wooden spoon, until thickened. Once you can draw a line with the wooden spoon and see the bottom of the pot, add the mizuame (glucose syrup). Cook a further 1-2 min until glossy. Remove one third of mixture to a separate bowl.

4 Parboil the halved or quartered chestnuts in a small pot, then drain and stir into the sweet potatoes in the pot.

5 In a small bowl, mix the matcha, sugar and boiling water to a paste. Stir gently into the the remaining third of the sweet potatoes. Stir this mixture into the chestnut sweet potatoes, creating a marbled effect.

Adapted from recipes in Kihon no osechi to shogatsu no omotenashi (Basic Osechi and dishes for New Year's entertaining), Gakken Hit Mook, 2008 and 2010 editions

Saturday, 2 January 2010

New Year in Japan: Osechi ryori


Happy New Year!! This is the first post for 2010. Hopefully we will be a bit more "regular" than we were in 2009. Thank you for reading along. And, as always, please leave a comment if you have something to say. Happy cooking!

If you are used to a rowdy Scottish Hogmanay or a backyard New Year's Eve in sunny Australia, New Year in Japan can feel a bit sombre and forlorn. Japan's NY is a family event, spent quietly at home, snuggled up under the kotatsu, with a box of mandarin oranges to hand, and a round of, ahem, enigmatic New Year TV specials for company.

Unless, that is, you are the cook and you try to beat your Osechi-dishes-cooked personal best. Osechi is the traditional New Year fare of Japan, but its preparation is such a marathon at an already busy time, that very few women make it from scratch themselves anymore. The Osechi cookbooks I own recommend starting on December 26 so as not to be disappointed. Personally, I bought this and that throughout December, but only started cooking 2 days out. But I wasn't doing the full Osechi. Not all of the traditional dishes spell yummy to me.

Last time, I didn't have a special 3-tiered jubako box for Osechi. This time round, I got a nice little one with a bunny and plum blossom motif for next to nothing. The plastic ones are just as lovely as the real lacquered ones, much easier to care for and a fraction of the price! I only used 2 tiers this year, but if I ever get round to doing the full production, all three tiers will come into play. In which case, I will definitely start a day or two earlier (g).

My selections this year were the gochiso buri daikon and East-Japan ozoni broth from two years back. Plus jubako tier 1 goodies: kuromame (sweet black beans), tazukuri (dried fish in soy-sake caramel), matcha-iri kurikinton (sweet potatoes and chestnuts with matcha green tea); and tier 2 yummies: date-maki (rolled sweet omlette with fish cake), matsukaze-yaki (gingered chicken meatloaf on skewers) and kikka kabu (chrysanthemum-shaped pickled white turnip).

I got the lovely seasonal place mats from Takashimaya department store.

See the following posts for recipes.

Saffron

Wednesday, 14 October 2009

Harumi's autumnal Japan 3: Spinachi and shimeji shiroae

Here's another of Kurihara Harumi's autumn delights from Haru-mi magazine. It is a kind of spinach and fungi salad dressed with tofu and sesame. Packing two veggies, a protein and sesame, this is the kind of cooking which earned Japanese cuisine its sometimes undeserved ;) reputation for healthiness.

Note, though, that this one dish does not dinner make. I would suggest a meat dish and another veggie side or soup, maybe even from this "autumnal Japan" series, plus steamed rice if you want an authentic Japanese restaurant "set menu" effect.

If you can't get hold of shimeji mushrooms, try any other variety. As before, usukuchi soy sauce is preferred here for its lighter color (shiroae literally means "white-dressed", after all). It is not essential, though, so use regular Japanese soy sauce if that is what you have.

Spinach and shimeji shiroae

Serves 4 as a side dish with other Japanese foods and rice

1 block of silken tofu (320 g)
1 pack shimeji mushrooms
1/2 tbsp cooking sake
1 tbsp mirin
1 tbsp usukuchi soy sauce
1 buch spinach (200 g)
2 tbsp sesame paste [S: tahini will do]
1 1/2 tbsp sugar
pinch of salt

1 Wrap tofu in a paper towel and weigh it down for 10 min to remove the water. Aim to have the tofu weigh about 40% less after this process.

2 Remove the base of the shimeji, separate the fungi and slice in half across the middle.

3 In a small saucepan, bring the cooking sake, mirin and usukuchi soy sauce to the boil. Add the shimeji and cook until all the liquid is gone, stirring constantly.

4 Divide the spinach into leaves and stems and slice into 2 cm lengths. Blanch quickly in boiling water, stems first, drain then revive in cold water. Wring out as much water as possible.

5 Pat the tofu dry and blend it to a pulp in a bowl. Add the sesame paste, sugar and salt, and blend well.

6 Add the shimeji and spinach and mix thoroughly. Adjust the seasoning, if necessary.

Enjoy!

Harumi's autumnal Japan 2: Hearty shiitake and ginger broth


Continuing with selections from Haru-mi magazine, here is a hearty shiitake mushroom and ginger broth with the surprising addition of minced chicken. Besides citrus, especially my beloved lemons, I don't think there's a flavour that does it for me as much as ginger. I really love the stuff. You might not have thought about putting it in soup before, but it really warming. This this broth will take you right through to winter.

At my place, dashi is made from bought "dashi packs"--teabag-like sachets that you just add to cold water, bring to the boil and leave to steep off the heat for a couple of minutes. Granulated dashi is also available but as it is already seasoned, you may need to exercise caution with the soy/salt if you use the granules instead. At a push, I suppose a chicken stock cube (and much reworking of the soy sauce) may also work, but the flavour profile would be totally different.

Usukuchi soy sauce (meaning "light flavoured") is a bit of a misnomer. The salt content is actually higher than regular Japanese soy, but the colour is lighter, so it is used when dark colouring is not desired. You are probably not going to want to buy a bottle just for this recipe, so go ahead and use regular Japanese soy. I won't tell if you don't.

Katakuriko is dogtooth violet starch powder in English, apparently (no, I've never heard of it either!). Cornstarch would work just as well. You want to just take the "liquidity" off the broth, not turn it into a sauce, so use with caution (g).

Hearty shiitake and ginger broth

Serves 4

100 g chicken mince
2 dried shiitake
1 knob of fresh ginger [S: or to taste]
4 cups (800 ml) dashi
2 tbsp mirin
2 tbsp usukuchi soy sauce [S: or regular Japanese soy sauce]
1 tbsp cooking sake
1/3 tsp salt [S: optional]
2 tsp katakuriko dissolved in 2 tsp water

1 Rinse shiitake and reconstitute in water. Gently squeeze out most of the water, then cut off the stalks and slice the top into 1 mm strips. Peel the fresh ginger and slice into matchsticks about 3 cm long.

2 In a saucepan, bring the dashi, mirin, usukushi soy sauce, sake and salt (if using) to the boil.

3 Place the minced chicken in a medium bowl. Pour 1 cup of the dashi mixture over the chicken, while quickly breaking up the meat with cooking chopsticks or a wooden spoon.

4 Retur the chicken-dashi mixture to the saucepan and return to the boil, removing the scum that forms. Add the sliced shiitake and ginger and cook for 1 min.

5 Thicken the soup with the katakuriko and water, then ladle into warmed bowls.

Enjoy!

Harumi's autumnal Japan 1: Gingered pork


I had some spare time when the Young Man was otherwise occupied and had a wander to the many local bookshops to find a seasonal Japanese "cookmook" I'd seen advertised in a magazine while waiting at the dentist's.

It's a funny thing, but most of the small book stockists in my area only have trashy weeklies, dodgy manga and the inevitable Back Section. Not really my kinds of places, which is probably why cooking mook pickings were also slim. Surprisingly, I found the advertised mook at the little bookshop in front of my local train station. It looked so-so, so I went with Haru-mi, the eponymous title by Kurihara Harumi, the doyenne of Japanese cooking. Think of her as Japan's answer to Martha.

I've said before that cooking Japanese on weeknights can be quite stressful. Ingredient lists tend to be long, recipes full of intricate steps, and worse, you need several such dishes to make one meal. There are not any short-cuts with that one, but this little dish is easy to put together and coordinate with others. It is the most basic version of the Japanese classic shoga-yaki I have yet to come across.

In Japan, wafer-thin slices of meat are sold at any supermarket. Meat has always been a luxury, and this is one way to make a little go further. The easiest way to replicate this would be to use your sharpest knife to shave slices off a block of semi-frozen meat. Luckily you don't need much. On which note, notice that 300 g of meat serves 4 people. Adjust accordingly if Japanese appetites are not found at your place.

Fresh ginger is essential to the recipe, and powdered ginger is not a substitute. It's fresh, zestiness is a good foil for the soy and mirin. A ceramic oroshigane grater like the ones here is what you need to get the ginger slush, but the finest side of a box grater will do as well. The Japanese herb shiso (aka ooba) (perilla) is not necessary here. If you don't have any, some thinly sliced basil would work, or just leave the cabbage plain to soak up the juices.

Harumi's gingered pork

Serves 4

300 g thinly sliced pork shoulder
3 tbsp soy sauce
3 tbsp mirin
1/2 - 1 tbsp fresh ginger finely grated to a slush
1 tbsp vegetable oil

To garnish
shredded cabbage
3 shiso leaves, shredded finely (optional)

1 In a small bowl, mix the soy sauce, mirin and ginger slush. Set aside until ready to cook the pork.

2 Immediately before frying, spread out pork slices in a single layer and cover with the soy sauce mixture.

3 Heat the vegetable oil in a frying pan. Take the pork out of the soy mix and fry quickly on both sides.

4 Mix the shredded cabbage and shiso and create a bed on a small dish. Place the cooked pork on top and serve immediately.

Enjoy!

Friday, 24 July 2009

Chilled tan-tan men


I've decided not to continue with my cooking classes at ABC Cooking Studio, despite quite a bit of arm-twisting in March, when they wanted me to sign up for an additional year of their new offerings, without first telling us what those might be. I think I made the right decision, as it turns out that the Japanese dish offerings, which were my main reason for taking the classes to begin with, would be reduced, and those they did present would tend to be of a more basic nature. That's the reason I didn't take a class in June, and why I am taking two this month to finish off the last of my prepaid lessons before they expire at the end of the month.

As it turns out, ABC are doing chilled tan-tan men, something I would really like to have done, NEXT month. Typical, really (g). Never fear. I had a look round the net for a recipe, and found the one I translated below on a fan site for the Japanese TV program Danshi Gohan (meals for men).

If you've been reading along, you'll know that I've already featured one recipe for tan-tan men, that great Japanese take on a spicy mince-topped noodle dish from Sichuan, China, on S&L. This recipe is a totally different beast, and not just because it is chilled (a popular presentation for noodles in the hot and sticky Japanese summer). Unlike the earlier version, sesame is quite predominant in this recipe. In seed, oil and paste form!

Highly nutritious, sesame is used extensively in Japanese cooking. There are white and black versions of both seeds and paste. White ones are used in this recipe. If you can't get Japanese sesame paste (or Chinese zhima jiang), you can always substitute tahini. The taste will be slightly different as, unlike the Japanese version, tahini is made from un-toasted sesame seeds. It will still be delicious, I promise.

Negi (Japanese leeks) and nira (garlic chives) may also be problematic sourcing in other countries. Western leeks are not a good substitute for negi, but at a pinch, you could use the white innermost core (Japanese leeks are only around 2 cm in diameter), or substitute finely sliced spring onions. Nira is not absolutely essential, you could easily garnish with some nice cooked spinach or bok choi, more spring onions or any other green thing you fancy.

The soup in this rendering strikes just the right balance between lightness and flavour for a summer's dish. The flavour comes from a shelfful of lovely condiments. If you don't make a lot of Japanese or Chinese food, you might not have some of these, but they are all pretty much staples in any Japanese kitchen. Just in case, you'll definitely want to read the recipe before attempting this!

Also, the recipe is for two, so don't forget to scale up if you've got more mouths to feed. Oh, and this makes a great lunch the next day. I took the cooked noodles-and-meat topping and soup in separate (leak proof!) containers and supped contentedly, catching up on news of the new Iranian revolution, at my desk at work.

Chilled tan-tan men

Serves 2

2 single-serve packs of fresh Chinese noodles

For the soup
500 ml cold water
3 tbsp white sesame paste (or tahini)
2 tbsp toasted white sesame seeds, roughly ground
1.5 tbsp EACH miso paste, oyster sauce, rice vinegar
1 tbsp EACH sugar, sesame oil, soy sauce
1-2 tsp tobanjan (douban jiang in Chinese) or other chilli-garlic paste, or to taste (optional)

For the meat topping
120 g minced pork
10 cm negi Japanese leek, very finely diced [S: or 2 tbsp finely sliced spring onions]
2 cloves garlic, very finely diced
1 knob fresh ginger, as big as your thumb, very finely diced
0.5 tbsp sesame oil
1-2 tbsp toasted white sesame seeds, roughly ground
1 tbsp EACH cooking sake, soy sauce and oyster sauce
Salt and pepper

To serve
Nira (garlic chives), snipped
Rayu (layou in Chinese) chilli oil

1. Prepare the soup. Mix white sesame paste, lightly ground sesame seeds, and miso paste in a large bowl, then gradually add the water, stirring until well blended. Add remaining soup ingredients and stir well. Check the seasoning, and adjust if necessary. Cover with cling wrap and refrigerate until needed.

2 Heat sesame oil in a frying pan over medium heat. Stir-fry the Japanese leek, ginger and garlic until soft. Add the minced pork and break up with a wooden spoon. Once browned all over, add the sake, then the soy sauce, oyster sauce and lightly ground white sesame seeds. Check the seasoning and add salt and pepper to taste.

3 Bring a large pot of water to the boil and cook the noodles according to the package directions (typically for 1.5-2 minutes), drain and plunge immediately into ice cold water to cool.

4 Once cool, drain the noodles and arrange in two large noodle bowls. Pour half of the soup into each bowl, top with half the meat topping and garnish with garlic chives.

Enjoy!

Just the thing for the mantlepiece: A square watermelon

Snapped in a Shibuya, Tokyo fruit shop window

In Japan, fruit is a favourite gift when visiting friends' homes, people in hospital and during the summer gift-giving season called Ochugen. If fruit is given, it is usually beautifully perfect specimens costing rather a lot more than one would normally pay when buying for oneself. And it should taste fantastic.

Then again, you might just choose a square watermelon instead! For just 15,000 yen (over US$150) you too can have a melon that fits in a box without rattling around. Just don't get your hopes up about the taste of such a rarefied melon. There's a disclaimer specifically disavowing any flavour guarantee.

Just what you always wanted, eh?

Saffron

Cooking class 11: Oil free cooking

For my next-to-last cooking class at ABC, the theme was oil-free cooking. On the menu were fluffy tofu-chicken balls topped with onsen tamago ("hot spring eggs", which are cooked slowly at a low temperature so the yolk sets and the white is runny; a soft-boiled egg in reverse) on a bed of rice with 16 grains, three salads, chicken soup made with the cooking water from the chicken balls and an acerola drink with aloe vera.

The main dish of tofu-chicken balls was a take on the yakitori favourite tsukune chicken balls, but simmered rather than grilled. Served with a sweet soya sauce based dressing, the runny egg and strands of nori, which look a little bedraggled in my photo :(, the dish was very tasty.

I'd seen the little bags of mixed grains that you cook together with white rice to boost nutrients and flavour, but never bought any as they can be pricey. Having tried it now, I think I might just get myself a bag as, aside from flavour and nutrition, I really liked the different textures. Overall, this was top nosh.

I don't know what the 16 grains are, but a similar thing, containing glutinous proso millet, pressed barley, red rice, purple rice, hulled barley, soybean, green soybean, azuki bean, germinated brown rice, pressed glutinous barley, sorghum, foxtail millet, Japanese barnyard millet, Job's tears and amaranth, is on sale at Amazon under the name "16-Grain Rice Booster".

ABC often offers classes that put the same ingredients in multiple uses. They call it "eco-cooking". Here tofu got the workout, appearing not only in the chicken balls, but also in the dressings for two of the three salads: gobo (burdock) salad with tofu dressing, mixed bean salad with curry-tofu dressing and mizuna and smallfry with ginger dressing. I especially liked the soy-vinegar-ginger dressing.

The acerola juice with aloe was a bit nondescript to me (I like my tart juices full on, not sweetened into nothingness). The addition of some ginger from the salad livelied it up a bit, and gave my class mates something to gawp at (g).

Monday, 25 May 2009

Cooking class 10: Drinking party snack plate


I took two ABC cooking classes in May, as there wasn't really anything I wanted to do among the June offerings. Actually, I wasn't planning on taking this class, either, but seeing the scrummy-looking plates that another class was tucking into quickly changed my mind.

What we had was basically a degustation menu for a drinking party! Seven more or less healthy snacks, a domburi of sliced bonito topped with Japanese aromatics, and a drink. Nine items altogether. Not bad for a 1-hour lesson. (One hour, by the way, because the teacher cleaned did the cleaning up while we ate and we only had to wash our dishes!)

So, what all did we get? From left to right in the top photo: (back row) deep-fried ginger pork; broccoli dressed in cod-egg mayonnaise; crunchy cherry tomato and rakkyo (Japanese pickled shallot) salad; (front row) octopus with kim chi; deep-fried bonito and cheese parcels; sardine, ume (Japanese pickled plum) and lemon pinchos; and Japanese-style summer rolls.

The cherry tom/pickled shallot combi really hit the spot with me. Tart and crunchy, but still healthy (unlike salt and vinegar chips, say (g).)

The pork was also a bit of a revelation, with the strips of pork basically flung into hot oil still in their marinade. This is the same technique used for frying chunks of chicken, but I'd never come across it for thin strips of meat. The katakuriko (dogtooth violet starch) magically forms a coating when it hits the oil. It's ingenious, really.

I was particularly super impressed with the rice bowl, which was topped not only with my favourite seared bonito, but ginger, myoga (Japanese ginger) and ao-jiso (perilla) and garlic chips as well! A very moorish mouthful. I will definitely be making this again, so stay tuned for a translation of the recipe.

Bonito also showed up arm in arm with cheese in little deep-fried "purses". These fun little bites would probably be perfect for anyone who needs their munchies to be fried.

In case you are wondering, it was not beer, cheap sake or shochu we had to wash this down, but cider vinegar soda. The girls found this a little tart, but it was still a bit on the mild side for me, even with the lemon garnish squeezed in (g). I reckon it also wanted some ginger juice to add a bit of zip.

Saffron

Wednesday, 4 February 2009

Cooking class 8: Buri-daikon, daikon salad, osuimono


I learned a great favourite of Japanese winter cuisine at my last cooking class: buri-daikon, or yellowtail simmered with long Japanese radish. Buri is my go-to fish in the winter. It's flesh is always juicy and the dark part a real delicacy. Plus it's one of the few fishes that the Young Man will deign to eat (g).

We had it with a mild clear Japanese broth (osuimono), which was a little on the bland side for me. The gu, or filling ingredients in osuimono can be virtually anything, but the broth is probably always based on ichibandashi, a stock made from kombu (dried kelp) and katsuobushi (bonito shavings). The redeeming feature of the one we made was a special egg concoction called shimetamago, or "squeezed" egg. This was made by pouring a prepared egg mixture through a slotted spoon so that it falls into a pan of hot water in ribbons, then gathering up the cooked eggy threads in a cotton cloth and rolling it in a sushi mat to produce a light, fluffy egg cylinder. It's a little bit of a performance, but a handy technique to know for when we find a killer suimono recipe (g).

With the theme of daikon, those long white radishes that you might have seen in Asian (i.e. Far Eastern) shops, we naturally had another rendition of daikon salad. I really liked the dressing for this one, which also features pulped daikon. Dikon overkill? Not really. Oxidization works on the pulped (actually grated so finely it becomes a slush) daikon, making it hotter so it's quite a different taste from the crunchy straws in the salad itself.

In the NHK science and food program Tameshite gatten, they found that pulped daikon stays sweet for the first 3 minutes, and then grows hotter, peaking at 6 minutes, after which the heat goes down slowly. So there you go. You can decide how hot you want your dressing and time the pulping accordingly. If you don't have an oroshigane, a metal or ceramic dish with raised "bubbles" that turn daikon, ginger, apple and other such things into pulp, I'm guessing a quick whizz in a small food processor would also do the trick.

And speaking of tricks, this was a clever way of using up the dried bonito flakes used in the dashi for the broth. Stir-fry them with some mild shishito Japanese chillies! There are no fans of shishito at our house, but I imagine you could substitute any other soft veggie with good results.

Saffron


Monday, 15 December 2008

Cooking class 7: Osechi traditional Japanese New Year's treats


In Just Over 24 Hours, I'll be jetting my way back to Australia for the first time in 2 years. Ostensibly it's to spend time with the parents and do the Christmas thing like a good daughter, but it will be so much more than that this time, what with graduations and ruby wedding anniversaries and who knows all what!

But Christmas, as always, is going to be the big one. With all the preparations in the mad trip lead up, you'd probably think I was mad trying to squeeze in one more cooking class at ABC before we leave. I mean I've not even done half the Christmas shopping yet!

Fortunately or unfortunately, the stomach just about always rules the mind in my case, so it was off to learn some more morsels of Osechi ryori, the traditional foods eaten for luck and wealth in Japan at the New Year.

Last year (technically the beginning of this year (g)), I had my first go at Osechi, choosing bites that most appealed to me. It turns out that I chose mainly from the 1st layer of the 2-tier festive box. As luck would have it, ABC was offering selections from the 2nd layer! (They've cleverly set it up so that you need to go two years in order to get the full compliment of recipes (g).)

From bottom left we have tori no matsukaze-yaki, baked seasoned chicken mince cut in the shape of a hagoita, the wooden paddle used to play the Japanese New Year's game of hanetsuki. We topped ours with white poppy seeds and aonori or green laver.

Next is datemaki, a fish-enriched egg pancake that is rolled on a special mat to give it a distinctive zig-zag pattern.

The white and pink ovals are kamaboko, a kind of steamed fish paste. This is eaten year round, but it's red and white colouring makes it an auspicious addition to the New Year's spread.

Crustaceans of all kinds are used in Osechi and the particular one chosen often depends on what the budget is. At ABC, we opened the bellies of some large prawns, sprinkled them with salt and sake, topped them with white and black sesame seeds and cooked them in the frying pan. Ebi no onisudare-yaki, easy and delicious.

The white "blob" in the front right of the top photo is not a bun but a small Japanese turnip called kabu. We cut into the flesh to make the petals of a chrysanthemum, then marinated the whole lot in citron juice and vinegar. I thought the flavour could have been stronger, but it turns out that these are usually left to marinate for a day or two, rather than the 20 or so minutes our lesson permitted. I also thought it would be nice to have yellow chrysanthemums, maybe painted with some gardenia (kuchinashi) dye, perhaps.

Accompanying all this was a different version of Ozoni to the one I made last year. In Eastern Japan, this soup is made with a clear soy-based broth and grilled square-shaped pounded rice cakes (mochi). The filling recipe offered by ABC was in the Western Japan style, which is miso-based, and contains round mochi that is heated in hot water.

Traditionally, Osechi is made over the last few days of the year (in the midst of a top-to-bottom "spring" clean of the house, no less), and eaten cold over the first few days of the year. Having a hot soup would be essential to stave off the cold in the old days.

As it was we, too, did not finally sit down to eat until after 9:40 pm, so we were all starving. Surprisingly, despite the late hour, each one of us was well contented after finishing what we'd made.

Saffron

Tuesday, 11 November 2008

Japanese spinach with sesame dressing

As my adventures at Japanese cooking school continue, it is becoming apparent that I am not coming through on the second half of the bargain: actually making what I learn for the Young Man.

However, short of ideas for a veggie accompaniment to a non-Japanese meal, I remembered the recipe for veggies with 2 sesame dressings from a couple of months back. Horenso no goma-ae (spinach in sesame dressing) is an old favourite, and very easy to make. It is meant to be eaten cold or at room temperature and keeps well in the fridge, so feel free to make it in advance.

This is a "white" version is made with sesame paste, which visitors to this site with a Middle Eastern bent will likely have in the form of tahini, tahina or tahin, amongst its many regional names. It is slightly different in taste from Japanese sesame paste, but will do very well just the same. I use it myself.

The recipe also calls for lightly ground sesame seeds, which in Japan you can buy in packets ready-ground or in a special grinder. If you don have access to these, a quick blitz in a mini food processor will do it or, if you want a more "authentic" feel, grind them yourself in a suribachi (which looks like a ceramic bowl with a washboard inside). You don't want to grind them too fine, though. It won't matter if some seeds stay whole.

The spinach is blanched quickly in boiling water and then gently squeezed as dry as possible before cutting into lengths. Do yourself a favour and don't cut the roots off the spinach bunches until after you blanch them, as this will make it easier to keep the bunches together for wringing (you'll probably be surprised at the amount of liquid that comes out, but do squeeze it all out or you'll end up with a watery mess). Of course, if spinach is only available as loose leaves where you live, you'll just have to make do, I'm afraid. I think you'll find this earthy but fresh side is worth the trouble anyway.

Oh, and you can use the dressing on the half the weight of Japanese mushrooms (maitake or shiitake would be good) or boiled green beans cut on the diagonal.

Japanese spinach with sesame dressing

400 g spinach, roots attached
2 tbsp white sesame seeds, toasted and lightly ground
1 tbsp brown sugar
1 tbsp sesame paste or tahini
2 tsp Japanese soy sauce

1 Wash spinach very well and drain. Bring a large pot of salted water to the boil and blanch spinach until it wilts. Remove and drain until cool.

2 To make the dressing, mix together the remaining ingredients.

3 Gather up bunches of spinach and squeeze as much water out as possible. Think squeezing out long hair after washing. Remove the roots and cut into 4 cm lengths.

4 Add the spinach to the dressing and mix gently but thoroughly.

Enjoy!

Friday, 17 October 2008

Cooking class 5: Tempura with bean & chestnut rice and tart octopus salad with Japanese egg "mayonnaise"

Tempura, deep-fried seafood and vegetable morsels served with a soy-based dipping sauce, is such a quintessentially Japanese dish it is easy to forget that it is actually a foreign import, brought by the Dutch.

Not one for the oily smell left after deep-frying at home, I was happy to do it in class at ABC, where it was teamed up with bean and chestnut rice and a show-stopping vinegared side dish.

The rice, which had a little "sticky" rice thrown in to give a little more texture, was flavourful and, with it's reddish hue, very autumnal. I wasn't able to pin down why the beans did not need pre-cooking and were merely cooked with the rice, but I suspect they were of a cooked and dried variety. Beans like that are eaten as a snack here in Japan, and are the beans of choice for throwing on Bean Throwing Day in February, when everyone expels "ogres" and welcomes good luck into their homes at the end of winter.

The octopus, cucumber and wakame side dish was superb. Particularly the kimizu (literally egg yolk-vinegar), essentially an oil-free mayonnaise. I learned a new cutting technique called snake's belly, where you make millimetre deep cuts on a slant on two sides along the length of a thin Japanese cucumber. This allows the cucumber to bend like a snake. It's not just for decoration, though: this helps the kimizu to penetrate into the cucumber. Ingenious! I am dying to make this again, but no one around me is game to try the octopus. Perhaps a little steamed chicken might substitute, but it definitely wants to be something slippery.

Saffron

Monday, 29 September 2008

Teriyaki beef with wakame salad


Authenticity vs innovation. Fusion vs faithfulness to origins. Is one more genuine and valuable than the other? Or is there room for both?--so long as the result is tasty, of course (g). It's a tricky business, this world of food.

I suppose I'm at the stick-with-tradition end of the spectrum. I get a kick out of sourcing odd ingredients for special recipes because I want to taste what the food would taste like in situ. I am not all that fond of cookbooks full of suggested substitutions for hard-to-find ingredients; much less those that don't even bother to give the originals, instead "helpfully" adapting traditional recipes for the "Western kitchen," or whatever. Don't even get me started on recipes that take a perfectly good tradition, then cavalierly change a few principal ingredients but fail to change the name of the dish! Perhaps it doesn't matter, so long as it's someone else's beloved Anzac biscuit or carbonara.

These days I see lots of "exotic" ingredients showing up in places that would make their traditional "owners'" toes curl. Living here in Japan, Western inventions like "salads" made with soba, Japan's buckwheat noodles, just seem so wrong. Call me a pedant, but here is a particular way to eat soba, and tossed with chopped herbs and veggies just isn't it.

Occasionally, though, you come across one of those rare sublime fusions that are so right and so in tune with the original cuisine that you wonder why they hadn't been thought of before! Take this roast beef and wakame salad, which is from Kitchen, a Marie Claire title written by Aussie food writer Michele Cranston.

Wakame, a much-loved, a-hem, sea vegetable is often to be found in salads here in Japan. You can even buy instant seaweed salad here: just add water! Teriyaki , a thick marinade cum sauce that is at once deeply savoury and sweet, is another Japanese staple, most usually slathered on fish and chicken, but superb here on beef. And ginger, a traditional garnish for teriyaki fish, really brings the flavours together in the dressing in this recipe. Truly, it's almost as if a Japanese person came up with the combination (especially if you use mizuna as I did rather than the more Western watercress)!

Oh, and the dressing contains no oil! Any way you slice it, this is a real winner in my book. Any Japanese friends out there, definitely give this one a go!

I usually make my own teriyaki no tare (teriyaki sauce) , so I'm including the instructions below. If you're making a batch for this recipe, be sure to start it first.

Oh, and though Michele has treated this as a starter, it is fairly substantial so some crusty bread or rice might be enough of a meal for lighter eaters.

Teriyaki no tare

100 ml mirin
100 ml Japanese soy sauce
100 ml sake
2 tbsp sugar

Reduce in a pan until the consistency of honey.

Teriyaki beef with wakame salad

Serves 4 as a starter

450 g lean beef fillet
3 tbsp teriyaki sauce
25 g dried wakame seaweed
3 Japanese or Lebanese (short) cucumbers
4 tbsp rice vinegar
1/2 tsp Japanese soy sauce
2 tbsp caster sugar
3 cm piece of fresh ginger, julienned
2 red radishes, sliced
1 large handful mizuna or watercress sprigs
1 tbsp black sesame seeds

1 Marinate the beef in the teriyaki sauce for 30 minutes. Preheat the oven to 200 degrees C (400 degrees F). Heat a heavy-based oven-proof pan over high heat and sear the fillet on all sides. Put onto a baking tray and bake for 10 minutes. Remove and set aside.

2 Soak the wakame in cold water for 10 min, or until soft. Drain, put in a bowl and cover with 1 tbsp vinegar. Thinly slice the cucumbers diagonally and put into a separate bowl. Sprinkle with 1/2 tsp salt and set aside to drain some of the juices for several minutes. [Saffron: Alternatively, just squeeze the juice out by hand.] Dissolve the sugar in the soy sauce and remaining vinegar and add the ginger. Rinse the salt off the cucumber [if you used the salting method] and gently squeeze dry. Combine the wakame, cucumber, radish and dressing in a bowl and toss to combine.

3 Thinly slice the beef and divide among four small plates. Top with the salad and garnish with mizuna or watercress and black sesame seeds.

Enjoy!